It seems appropriate that we’re writing a blog about setting up a HubSpot account in the same year that Disney is preparing a remake of one of the 90’s biggest hits, Aladdin.
Not only is it a chance to see Will Smith sprinkle some magic across the big screen as ‘Genie’, but it’s just the excuse we’ve been looking for to dust off our favourite gif/childhood theme song around the office:

The Genie delivered some magical moments in the 1992 release of the film, but his powers were limited to just three wishes.
So we’re hoping you’ll forgive the team here at Uku HQ for breaking out into a stirring rendition of ‘a whole new world’ each time we’re able to set up a HubSpot account for one of our clients and showcase what really is a whole new world of marketing and sales.
Whether you’ve signed up for the marketing hub, the sales hub, free CRM or even the new service hub, there are some simple steps, to begin with, to get your account up and running.
If you’ve just logged into your new HubSpot portal and see something along the lines of this:
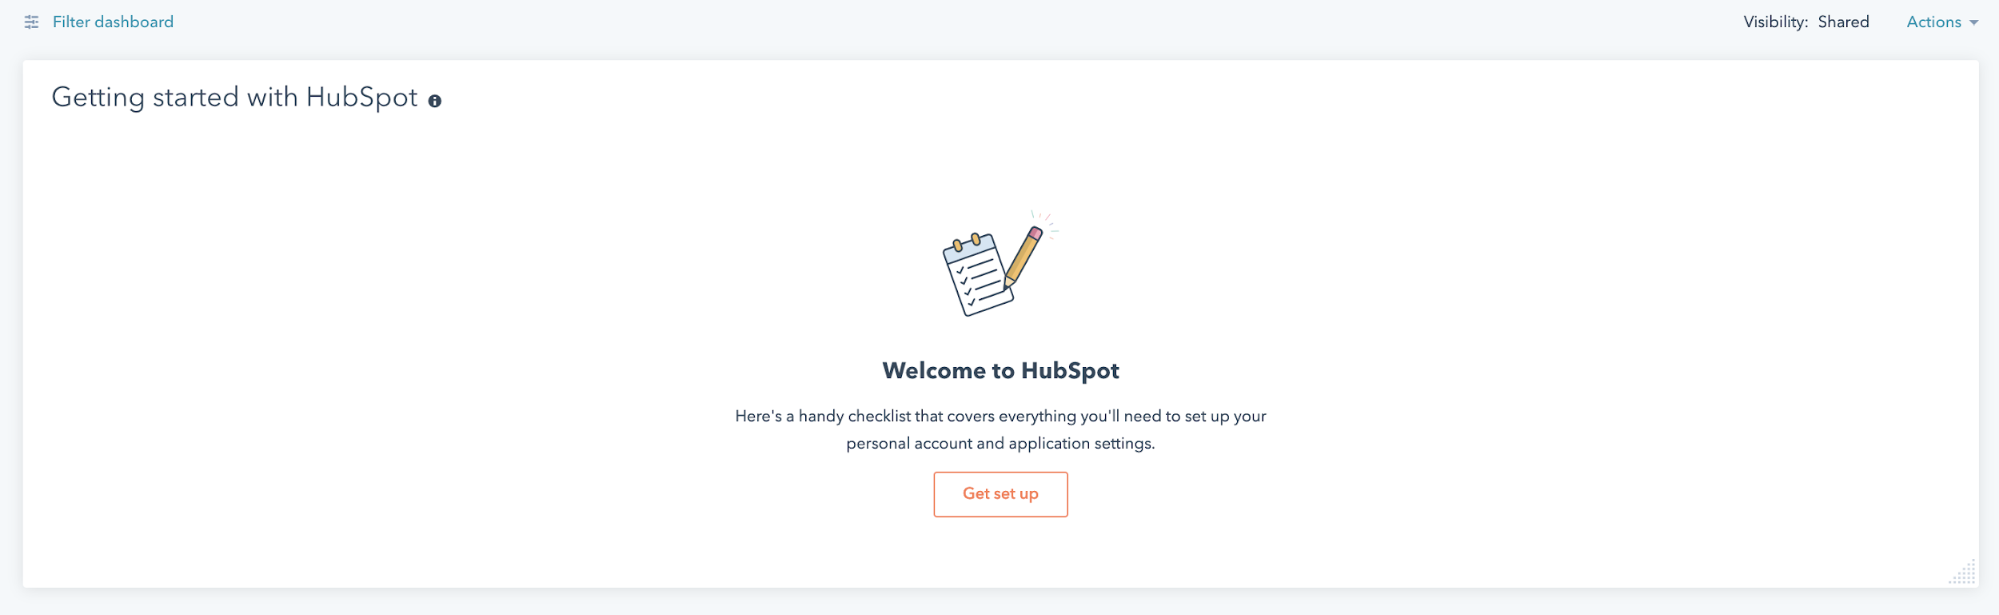
You’ve found the right blog to get you through your account set up.
We’ve selected 6 of the most important setup steps you can tick off right away, without too much hassle.
1. Invite your colleagues or clients
2. Connect your social accounts to HubSpot
4. Installing your HubSpot tracking code
5. Integrate HubSpot with Google Analytics
So let's start with…
The easy stuff.
Before we get going, one of the highlights for the first time HubSpot users is just how easy the UI and navigation is to understand.
By taking HubSpot’s direction and selecting the ‘Get set up’ call to action on your account dashboard, you’ll conveniently land within HubSpot’s projects portal where your set up checklist awaits:
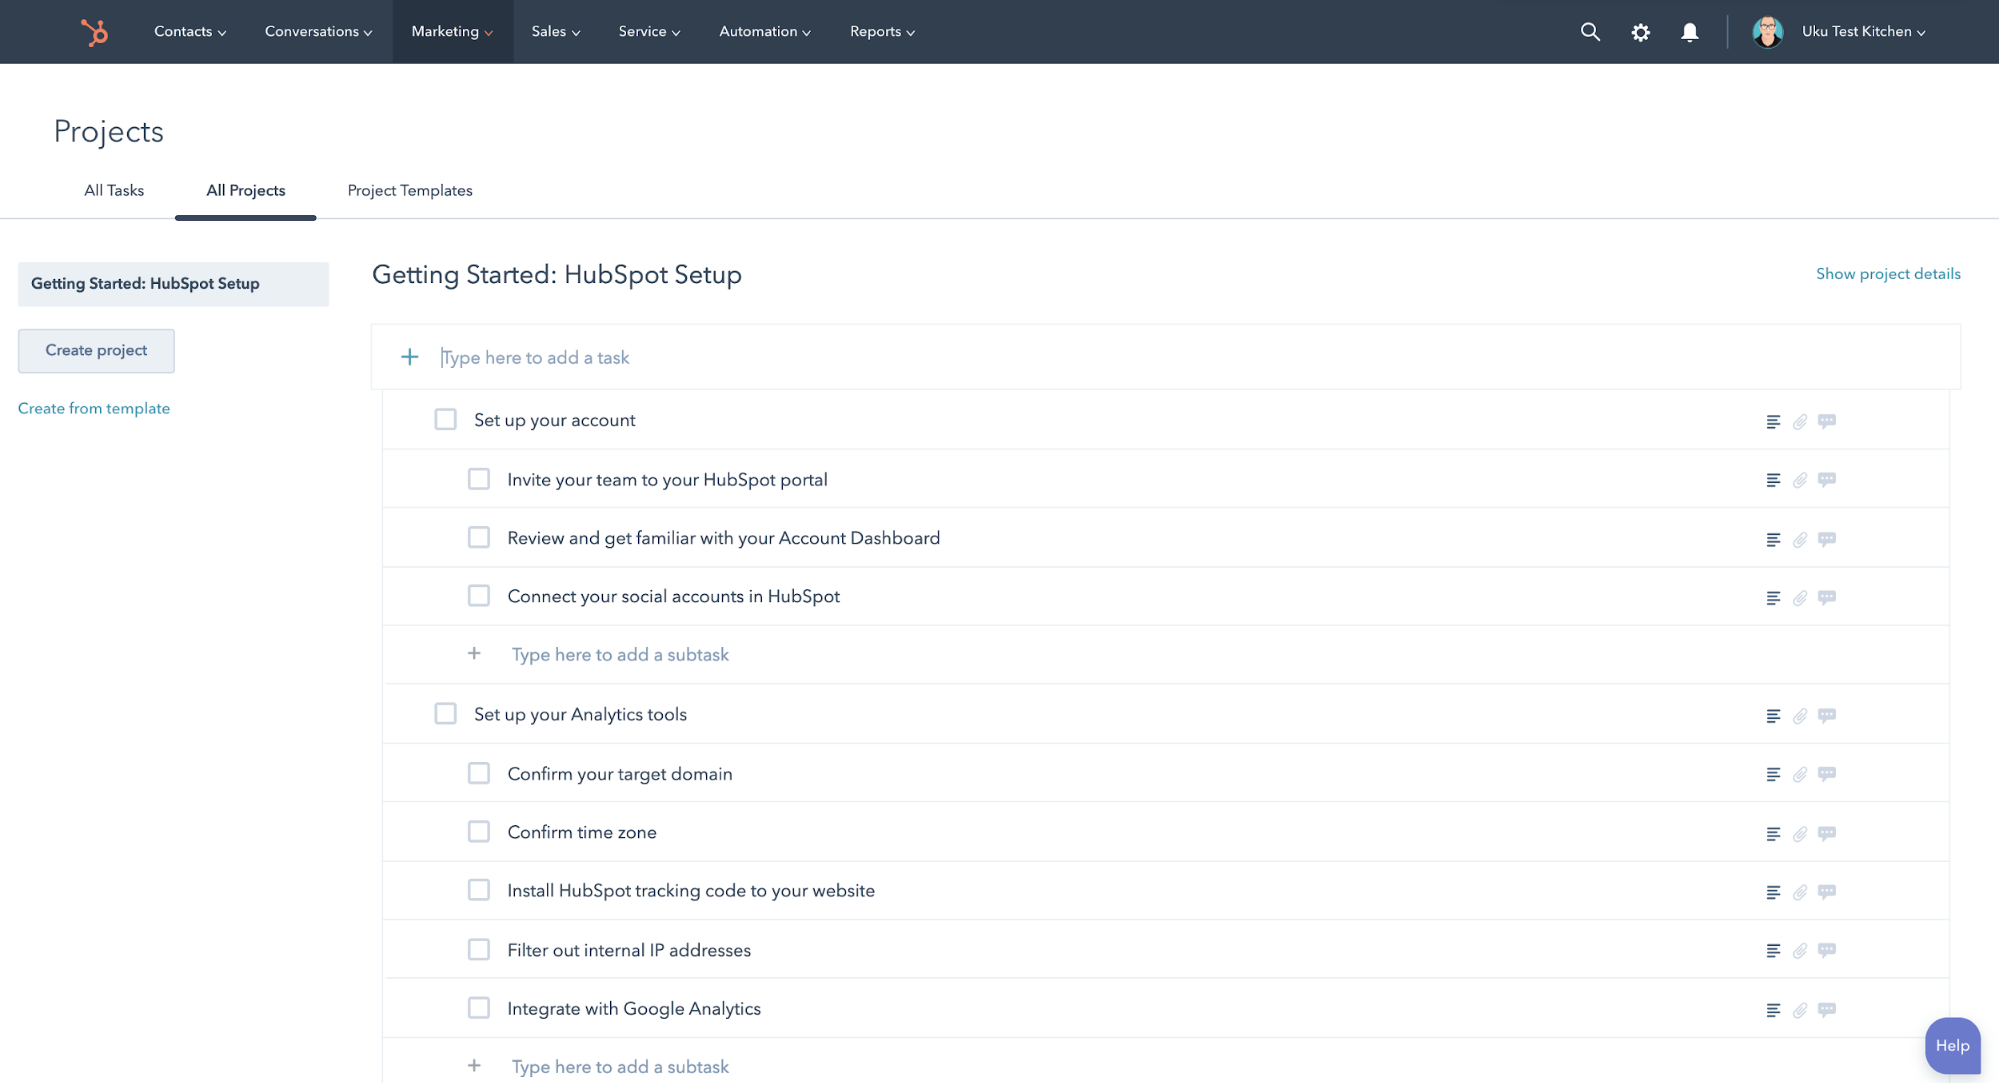
This is easily one of my favourite features in an account set up. The tasks are laid out in an easy to understand manner, and the checklist is easy enough to understand right from the word go.
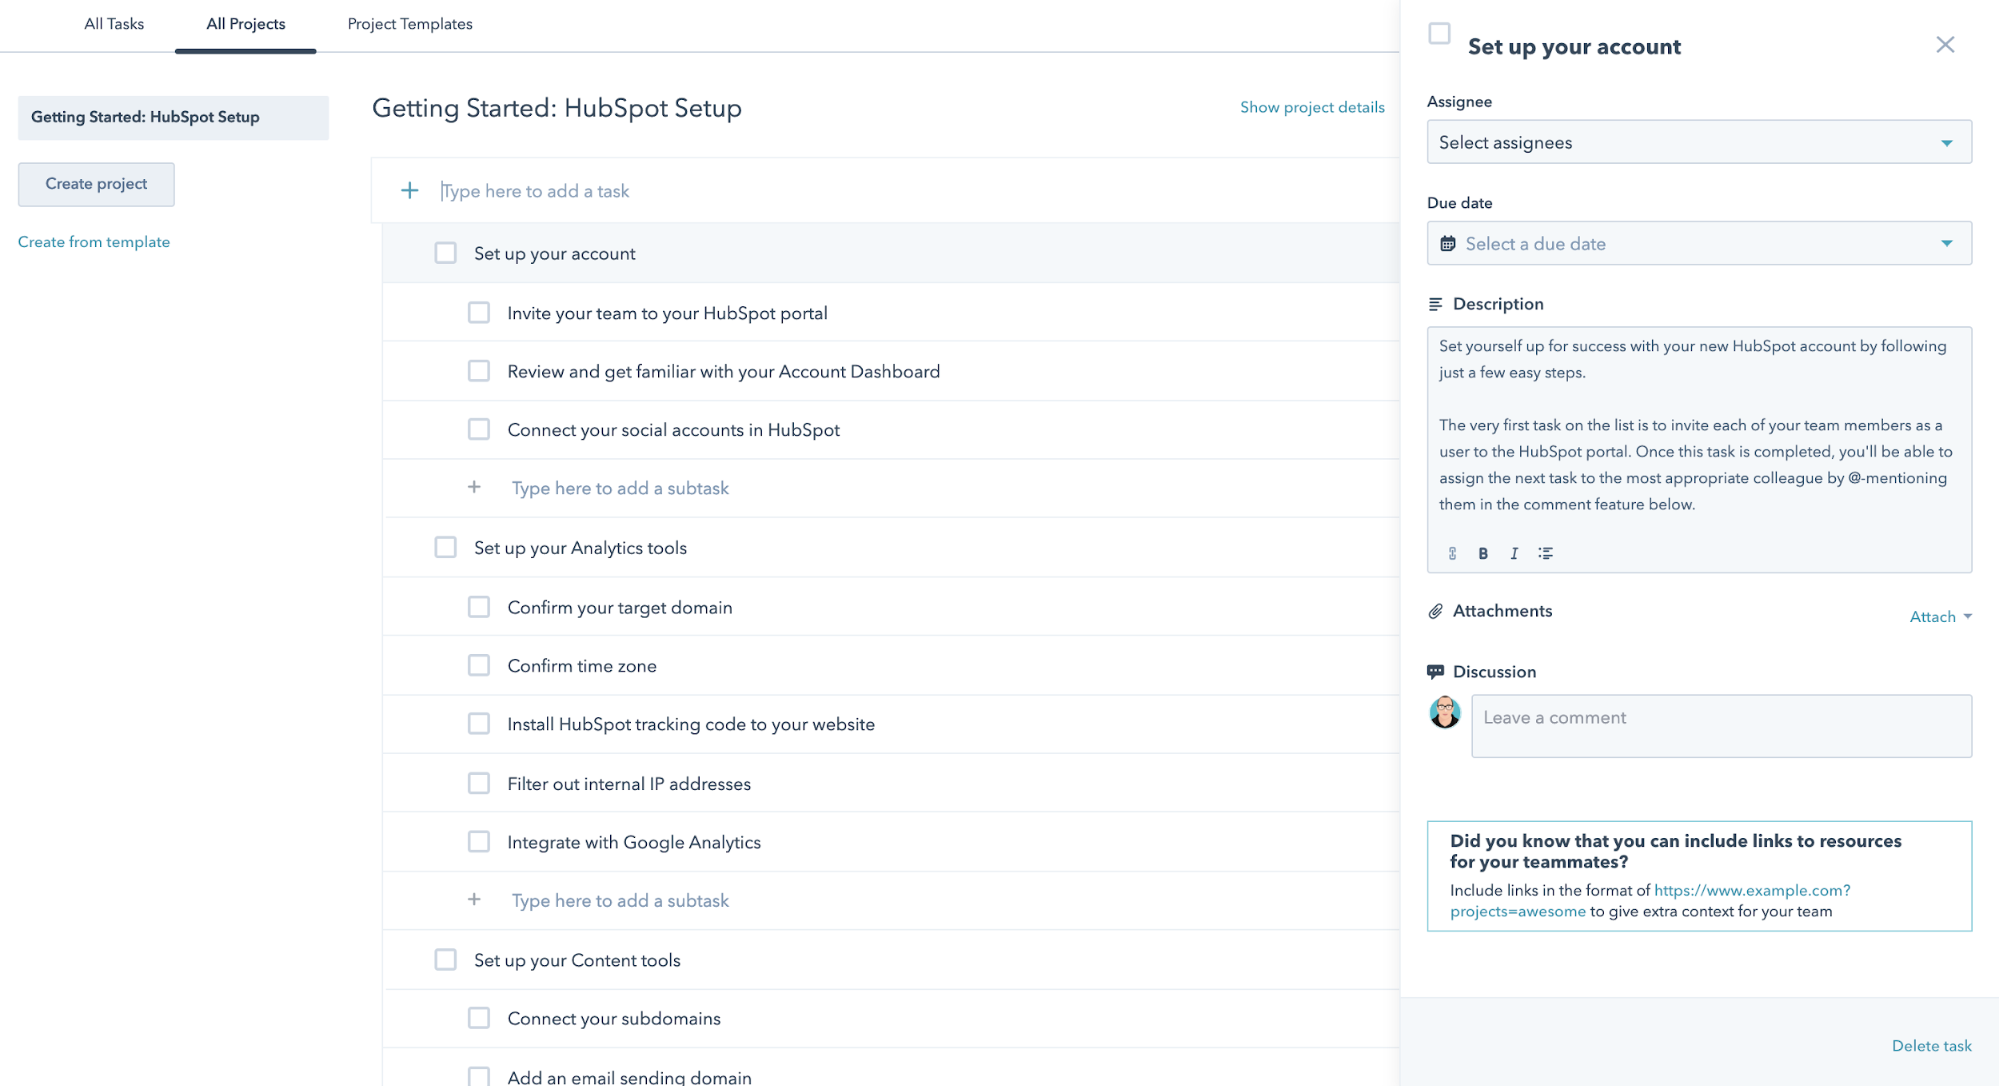
Plus clicking on each task unveils its own description and guides in case any new users get lost.
1. Invite your colleagues or clients
Your HubSpot account doesn't have to be a lonely one.
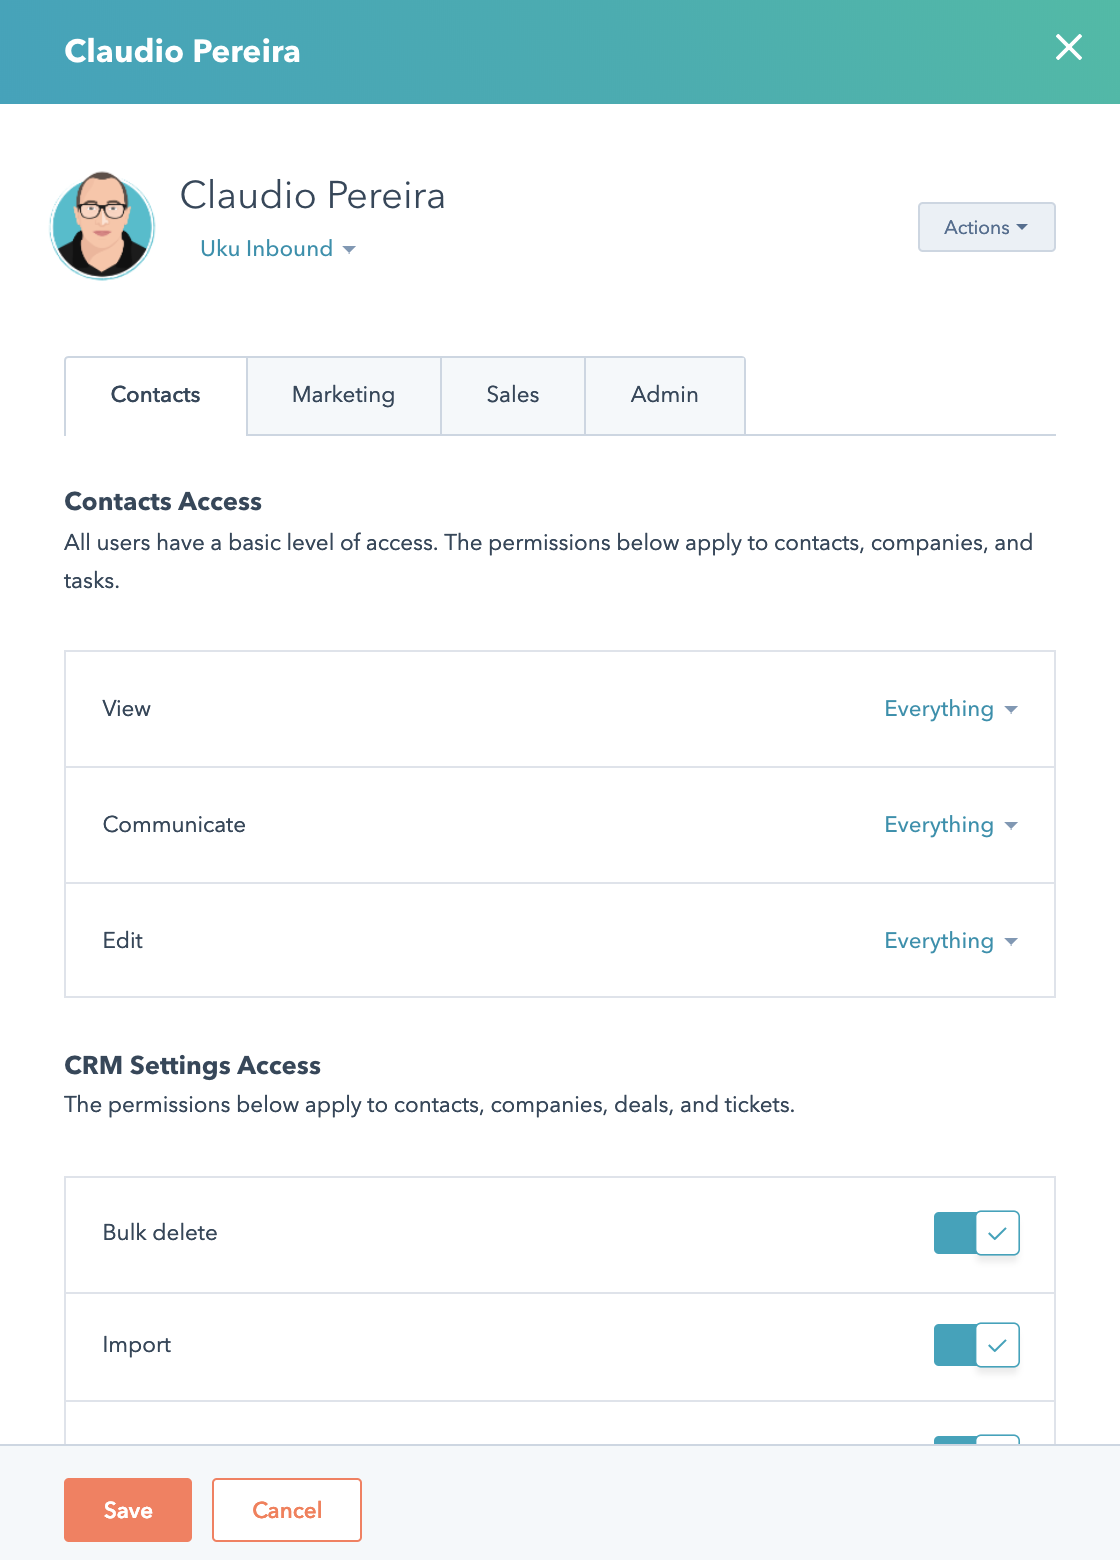
User management within HubSpot (hidden inside the settings gear icon) is fairly simple. You can go ahead and add new users one by one, with only their email address or bulk upload via a CSV.
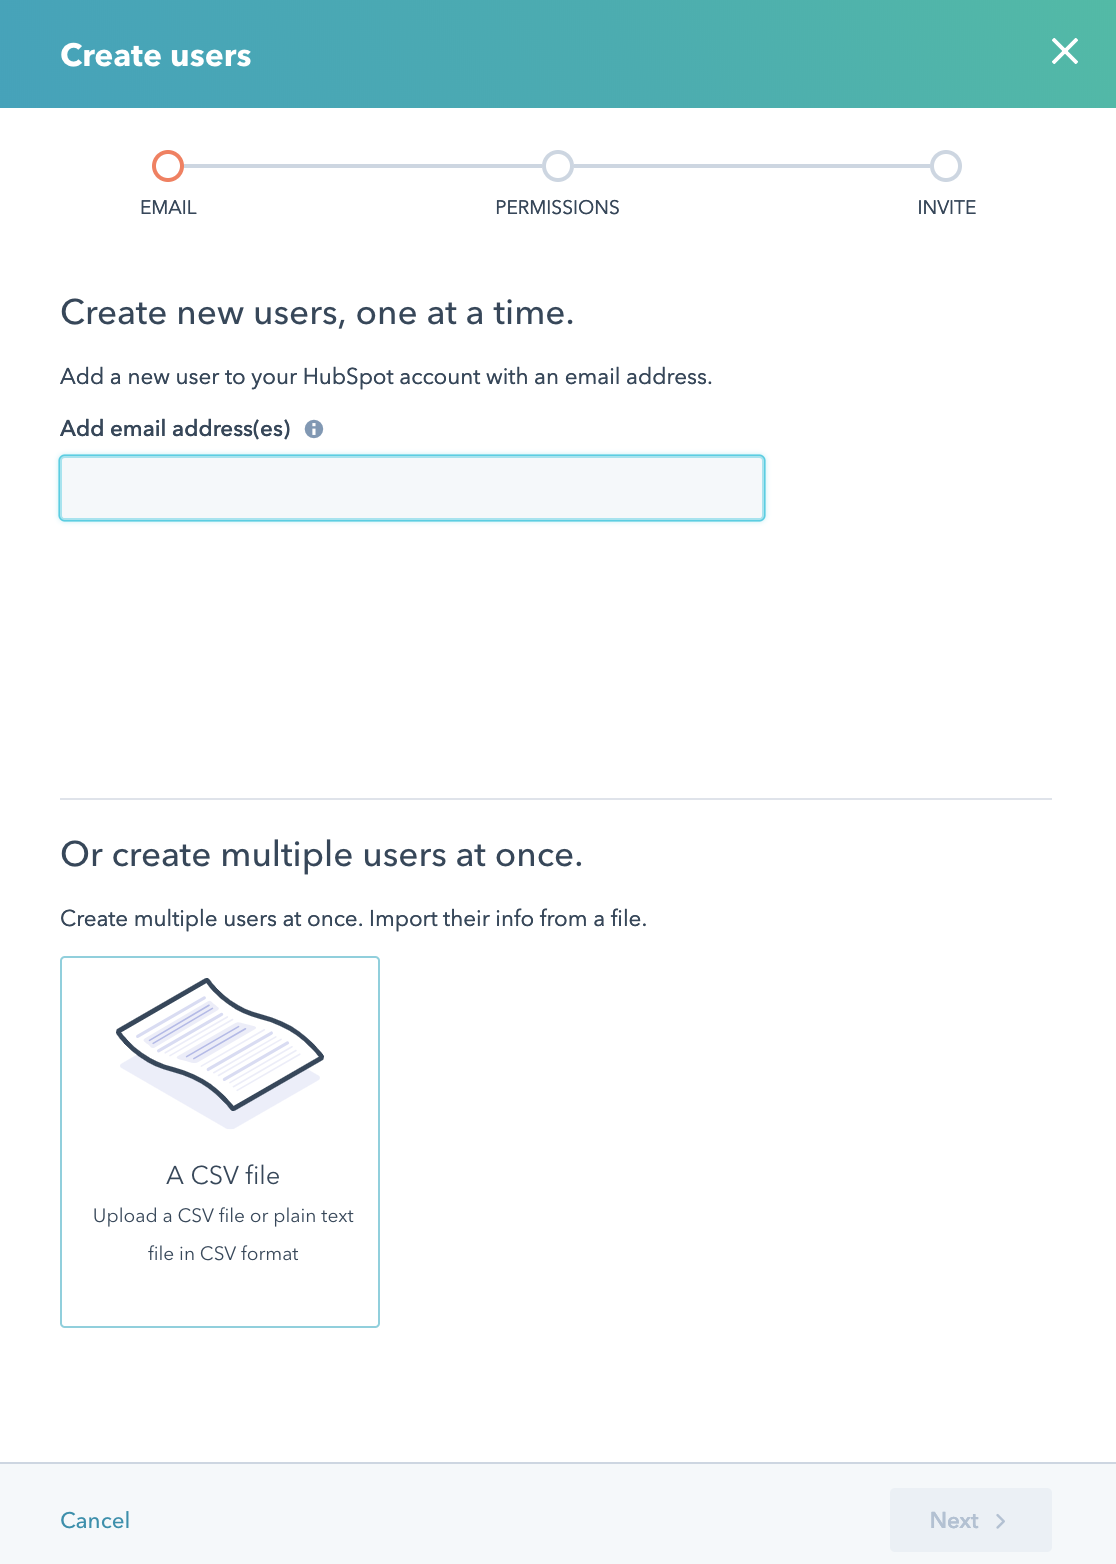
Once you’ve added your colleagues or clients email addresses, you can select their level or rights and access them on the platform.
HubSpot will automatically generate a welcome email to anyone you’ve invited to the platform, prompting them to create a password and log in.
*An Uku Tip*: HubSpot provides a ‘learning dashboard’ to every new user with links to relevant courses run by the HubSpot learning centre. Most of the videos are fairly short and cover a lot of useful information. It’s definitely worth encouraging new users to set aside some time to go through the learning centre dashboard!
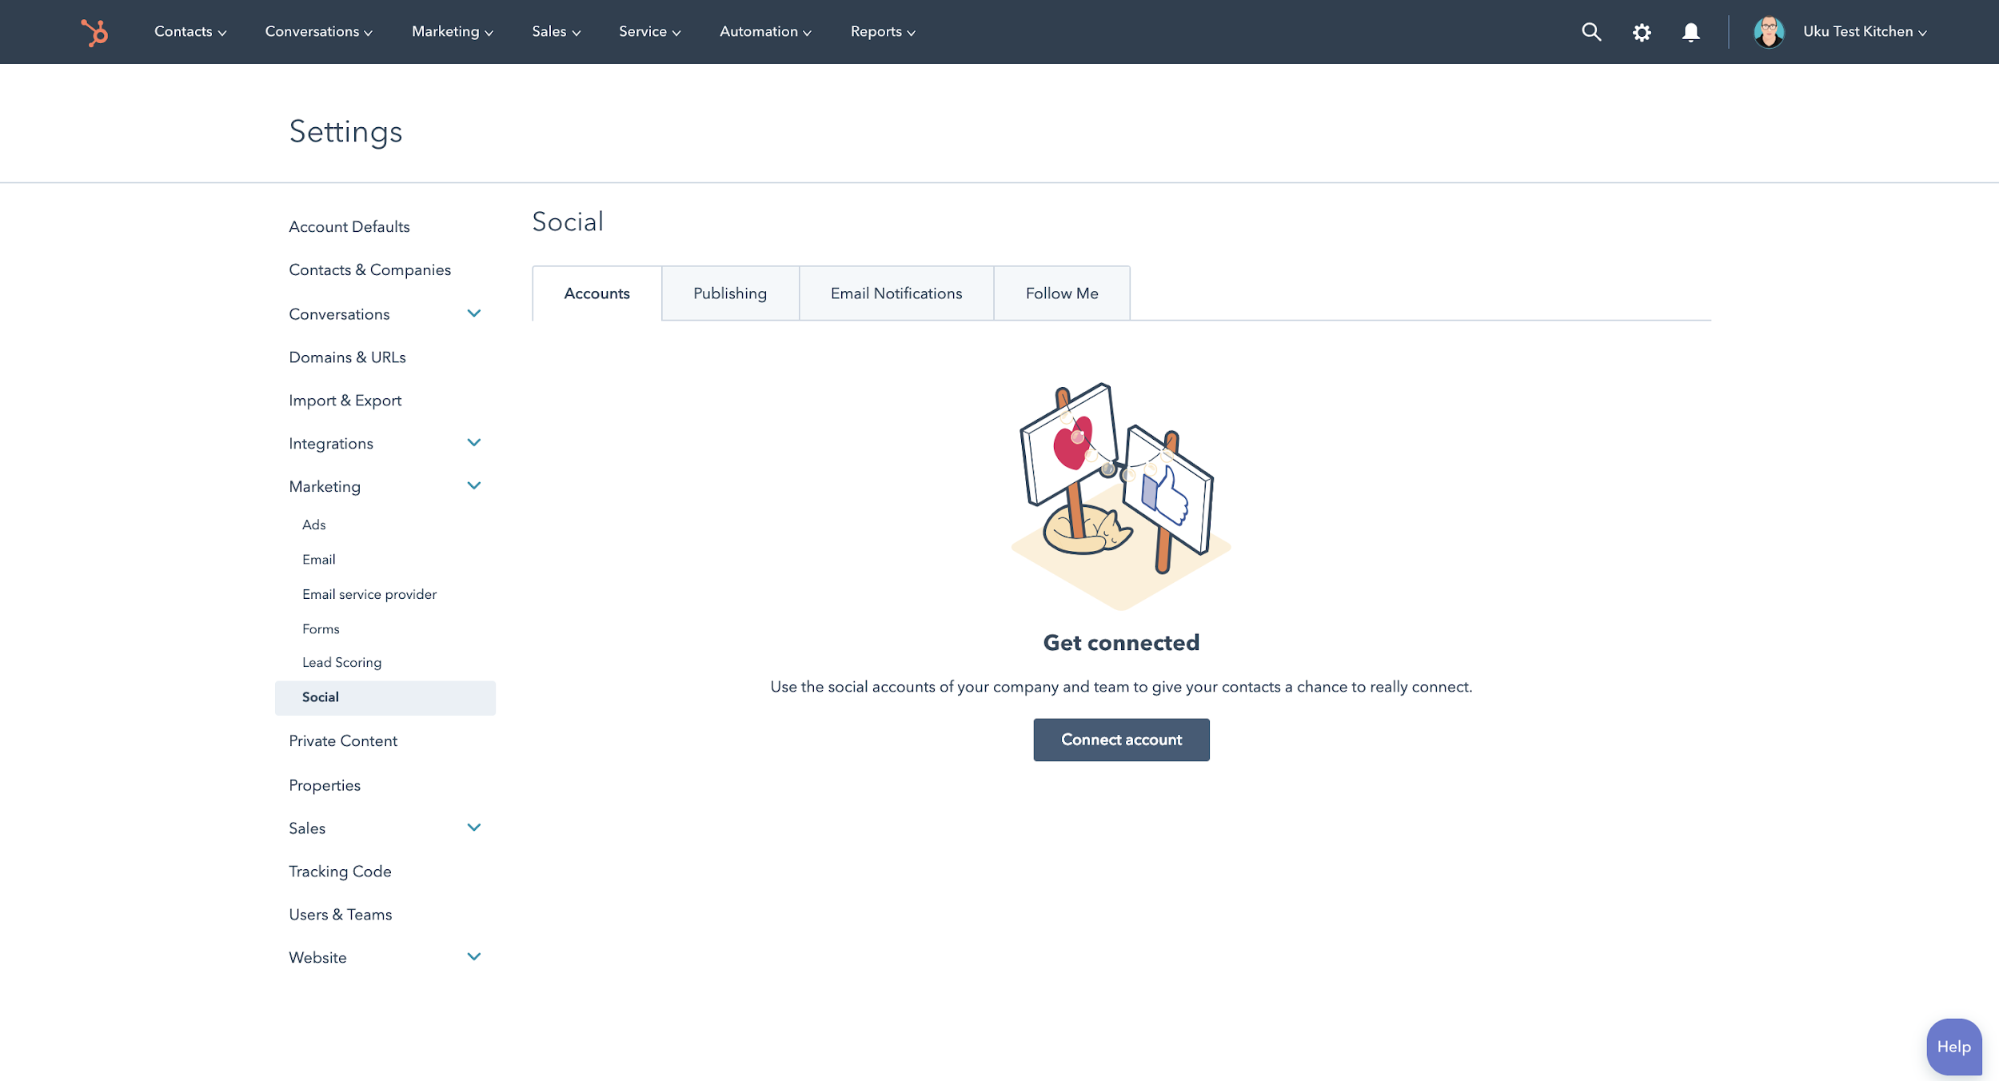
2. Connect your social accounts to HubSpot
A key cog to any inbound marketing machine is obviously social media. There are a number of social media management products and services on the market, but HubSpot’s scheduling and monitoring tool is quickly becoming a social media marketers favourite.
The account set up is easy too:
Connecting Facebook, Instagram, Linkedin & Twitter takes less than a minute for each account. After you’ve selected the platform you want to connect to HubSpot, you’ll need to log into the selected platform and grant HubSpot access to post on your behalf and you’re done 👍
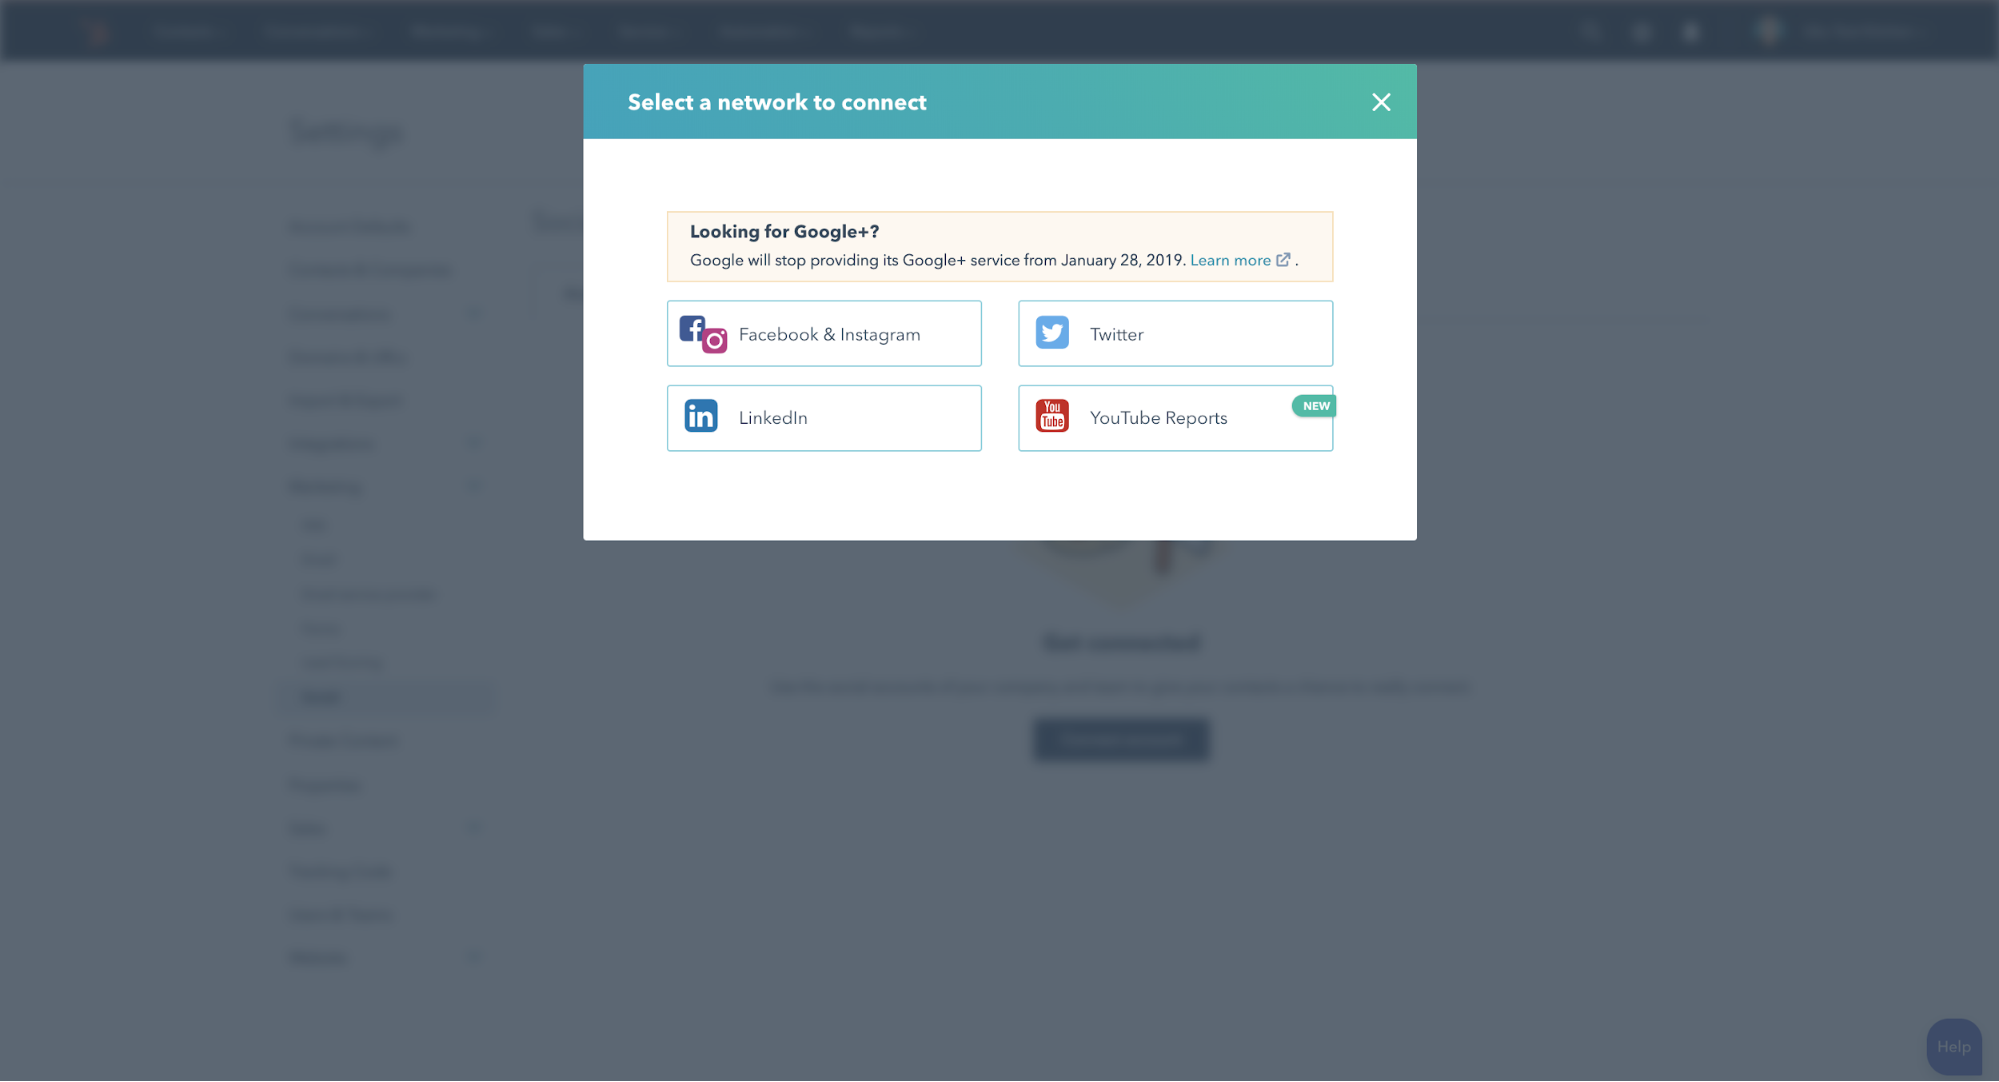
Interestingly, HubSpot has recently launched a seamless YouTube integration that pulls in crucial video analytics data too!
So you’ll be able to monitor and report on how well your YouTube channel is performing through HubSpot, just as you would for a blog post or landing page.
3. Import your contacts
If you’re migrating from another CRM into the HubSpot Sales version, you’re able to quickly import contacts, companies, deals or even opt out email lists without too much hassle.
When choosing to import deals or contacts, HubSpot will direct you to a splash page that breaks down exactly how to prepare a CSV sheet for upload:
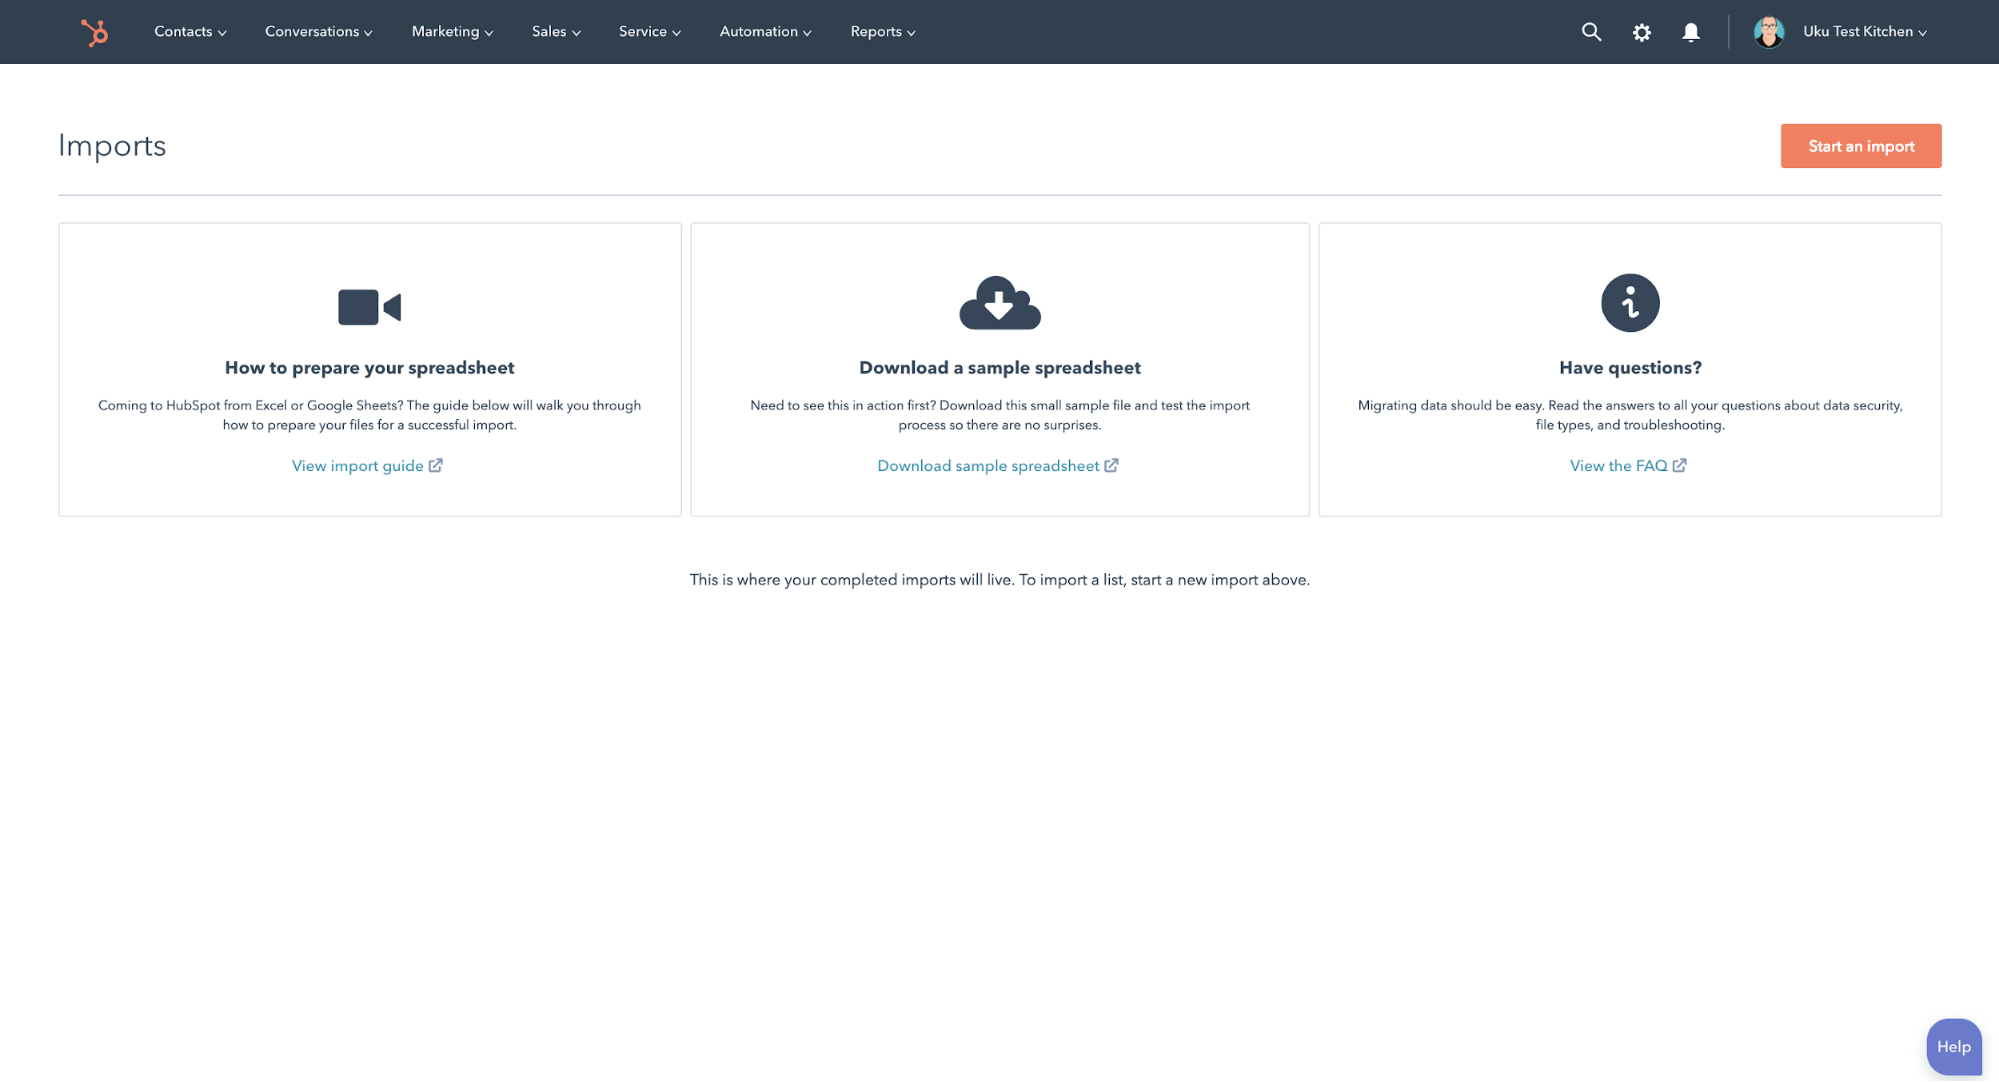
From there it’s all pretty easy really, you can choose between uploading one document, or multiple. Define whether they’re deals, contacts, companies or lists that you’re uploading.
Plus if you’re signed into HubSpot with a Gmail address, you can even choose to import all your existing Gmail contacts without even having to upload a CSV!
So you’ve unlocked a new world of digital marketing and marketing automation with HubSpot, but worried about your site’s speed and rank on Google? Try our free SEO audit below and see how your website ranks!
The not so easy stuff.
Whether you’re a technical genie or not, we’re pretty sure you won’t have any hassle with the next bit.

So don’t panic. We may refer to the next 3 steps as the not so easy stuff, but in truth, it’s all pretty simple and easy enough to get right.
4. Installing your HubSpot tracking code
In order to make the most of HubSpot’s reporting tools and dashboards, HubSpot will need to track user behaviour on your website.
If your website is hosted outside of HubSpot, be it Wordpress or another host, installing your code is fairly simple.
Hidden inside the settings gear icon, your tracking code can be found in its own tab under the settings navigation:
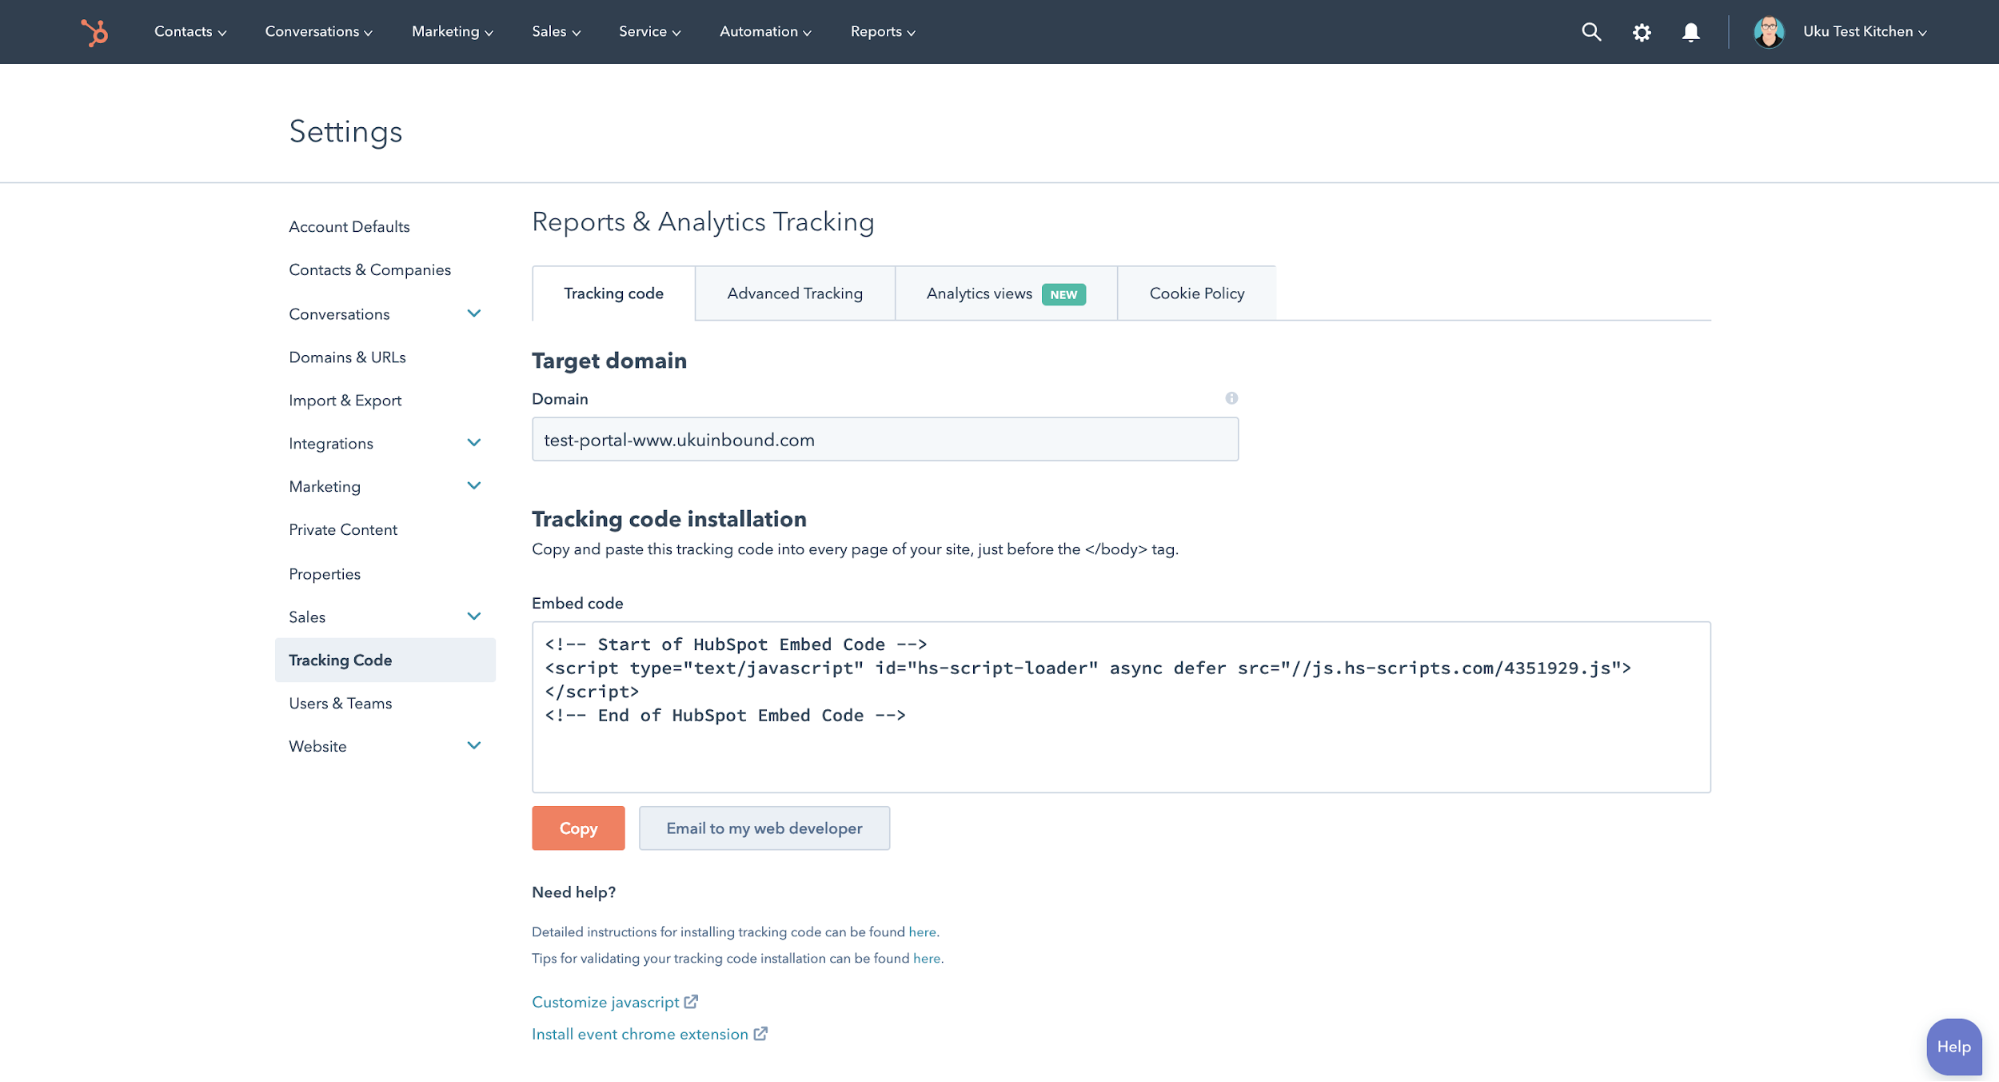
Once you’ve found your code, installing it is simple.
You can choose to copy your embedded tracking code displayed, and paste it into the header section of your website.
Or if you prefer you can even choose to email the code and installation instructions directly to your website developer, or a team member who is tech-savvy enough to install it.
Luckily if you’ve decided to build your entire website out on HubSpot, you won’t need to install the code manually.
5. Integrate HubSpot with Google Analytics
To ensure that lead generation, user behaviour and website visitors reporting is seamless, it’s a good idea to connect your Google Analytics account to your new HubSpot portal.
If you haven’t set up a Google Analytics account, you can do so here.
Connecting your account is as simple as copy and paste within HubSpot.
If you head on over to the pages section of your website settings in HubSpot:
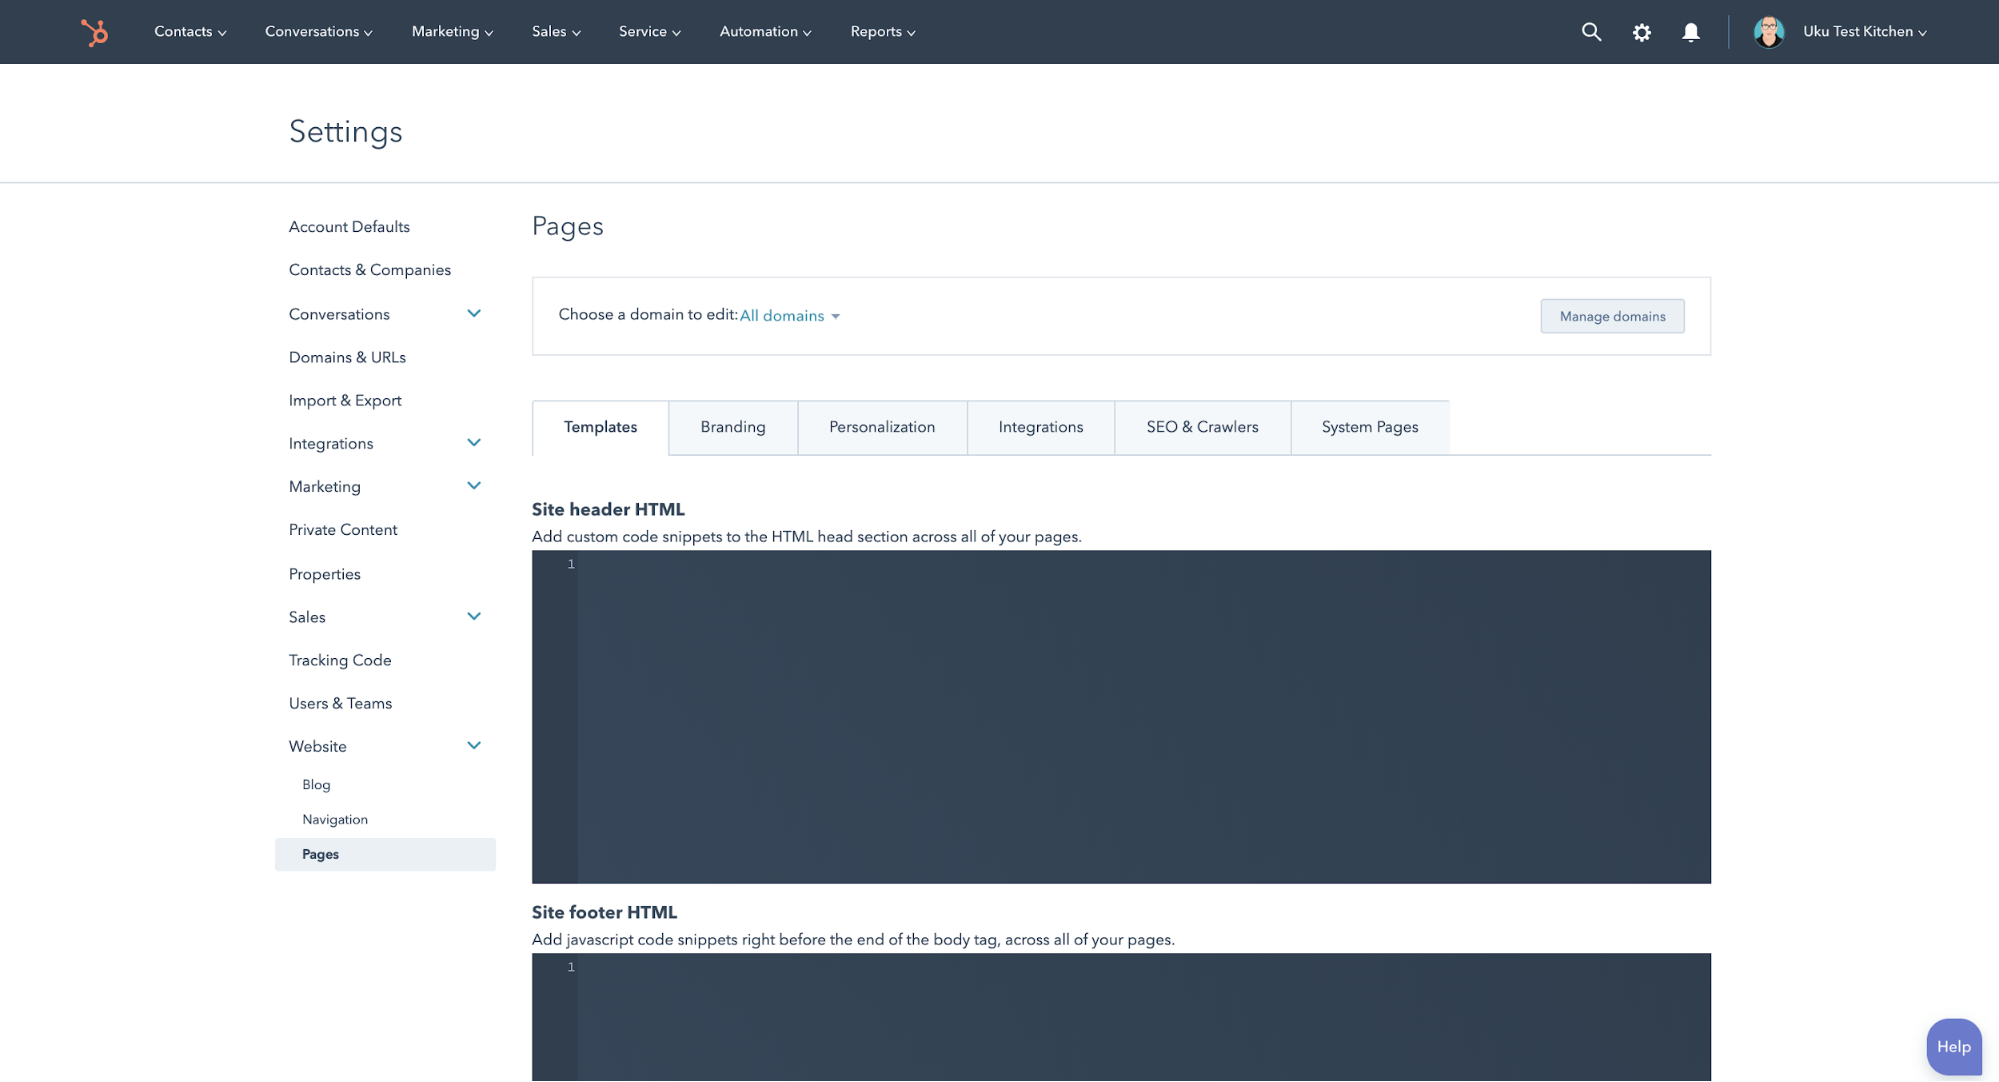
And select the integrations tab, all you’ll need to do is select the ‘Integrate with Google Analytics’ checkbox, and paste in your unique Analytics tracking code.
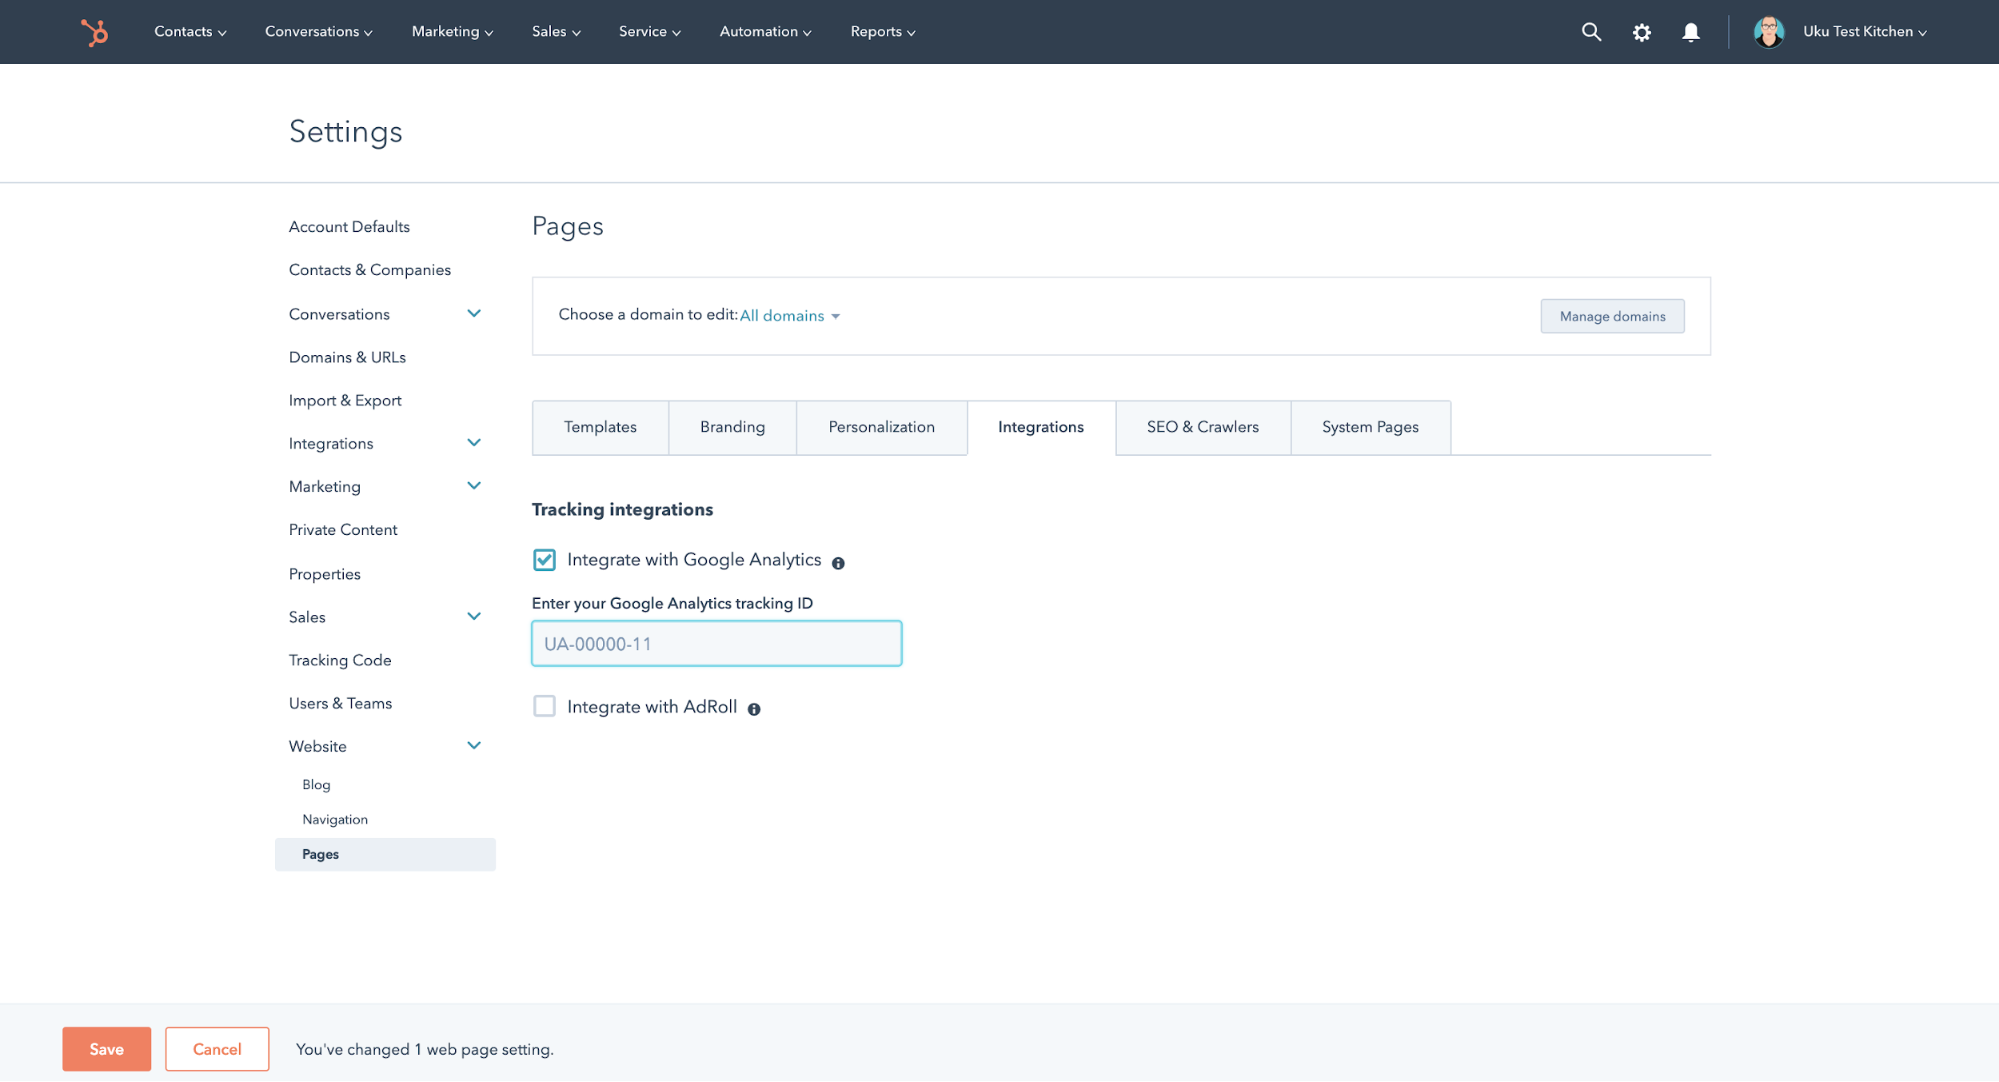
If you’re not sure where to find your ‘UA’ code, this might help.
6. Set up some subdomains
Last but not least, you’ll need to set up some subdomains for your HubSpot account.
If you’re on the Marketing professional or enterprise HubSpot accounts, hosting your blogs and landing pages, and web versions of any emails you’re sending out through a HubSpot subdomain unlocks a world of reporting, testing and boosted search engine optimisation.
It starts with finding the right name for your subdomain. If your site is hosted on Wordpress or a CMS outside of HubSpot your subdomain will look something along the lines of www.blog.yourdomain.com or even www.lp.yourdomain.com.
To create the domain, you’ll need access to your domain’s DNS host.
Once you’ve got access to your DNS host, head over to the ‘Domains & URL’ tab of your HubSpot settings and select connect your domain.
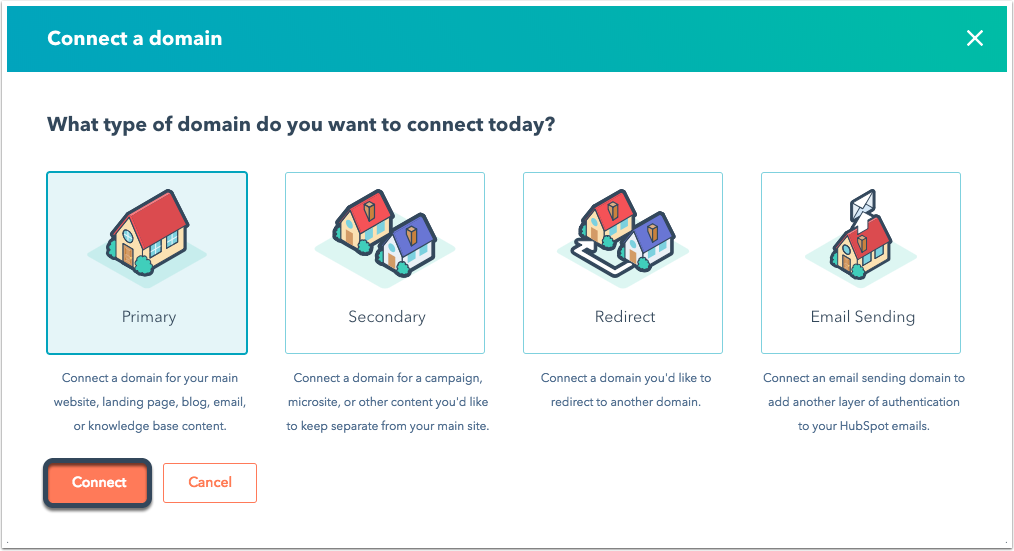
Your next step is to select the type of domain you’re trying to connect.
For landing pages, blogs and emails, you’ll need to select ‘primary’.
You’ll then cycle through a few steps of selecting what your subdomain is for (blog, landing page etc), naming your domain, and verifying that the URL structure is correct before arriving at the all-important step of updating your CNAME & DNS records to match your new subdomain.
If your DNS provider is ‘GoDaddy’ you’re in luck. HubSpot has a seamless integration with GoDaddy that can automatically update your records from your GoDaddy account.
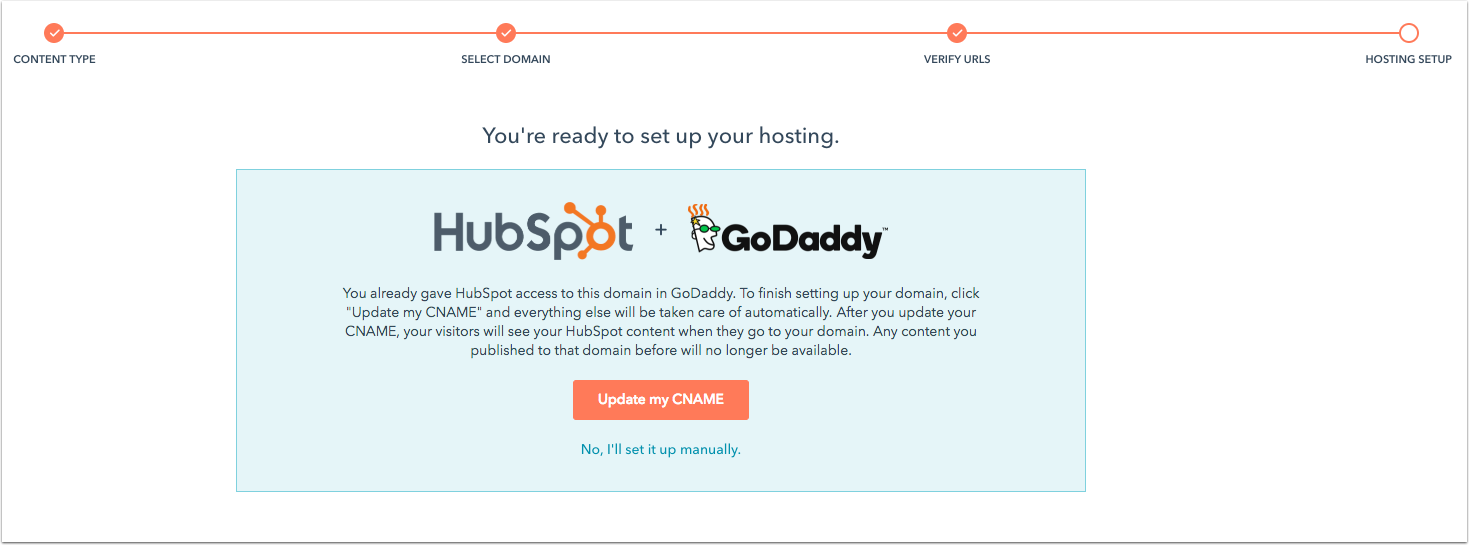
If you’re hosting your domain elsewhere, you’ll need to change your DNS records manually. Luckily HubSpot has a number of guides to walk you through even the trickiest of steps.
All the other stuff.
Of course, setting up your account doesn't mean that you’ll automatically get the very most of it.
One of HubSpot’s strengths is their wealth of knowledge and courses that they provide through the learning centre attached to every portal.
You’ll probably have noticed a dashboard with ‘recommended learning’ on your account home page:
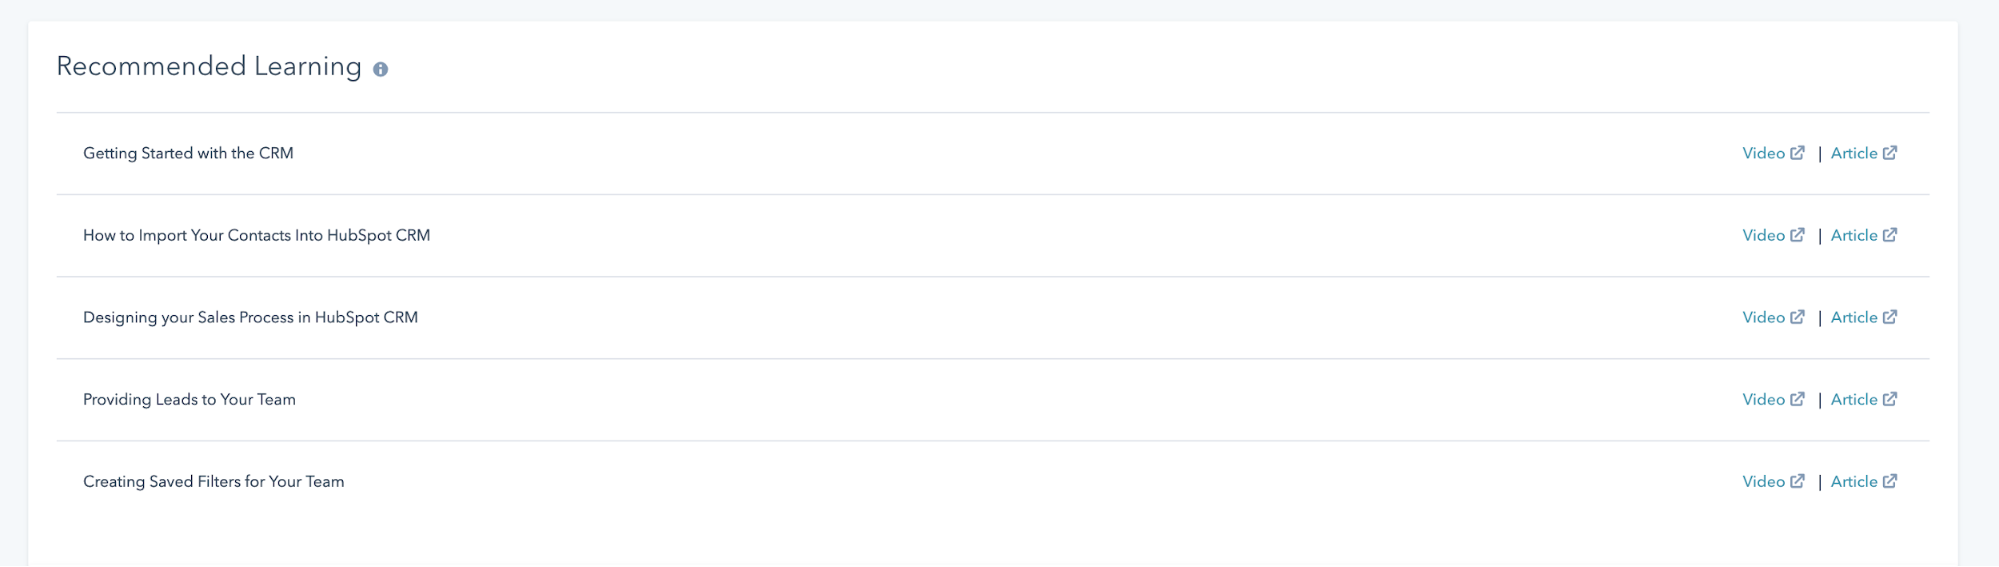
If you’re new to the inbound methodology, content marketing or even lead nurturing, you’ll want to explore the learning centre. It’s worth its weight in gold.
And last but not least, if you’ve just signed up for HubSpot but you’re really not sure what to do next, call us. We’ll help 😉